Patching In A Pinch
Many of the businesses we work with run into situations where they need to patch some concrete.
While we are masters at concrete coatings and concrete repairs and are here to support you, there are times when a concrete repair may make sense to patch in-house.
For those times, here’s the official Colorado Concrete Repair guide to getting a reliable, fast, patch in a pinch.
In this guide, we will cover partial depth repair that IS NOT on a joint. But, we have a tip for those who have a patch on a joint, without breaking out a grinder and creating an OSHA issue.
Materials
-PPE – glasses, gloves, respirator, earplugs could be helpful, it might get noisy.
-repair mortar
– doesn’t stick to concrete very well
– spend $20 and get a durable repair grout that adheres to concrete. We like Cementall at home depot.
-trowel
-wire brush
-hammer
– drill
-mixing paddle
-mixing bucket
Preparation (1)
Like any project, preparation usually means the difference between success and failure—cone off the area for safety. Put on your PPE.
Take your time, remove anything that might be loose, and use the hammer to remove anything that is barely hanging on. Good concrete should have a higher pitched “ting” sound to it when hitting with a hammer.
If it has a hollow thud, remove it. If in doubt, hit the spot that you know sounds like is good concrete. Once you have all the loose or weak areas removed do a great job cleaning up all that debris, preferably with a vacuum.
Preparation (2)
-Ok! We have a suitable substrate, we have good repair material, but wait, don’t mix it up yet. Cement-all is an excellent material, but it sets QUICK. So, get all your ducks in a row. Have plenty of water, have your trowel ready to go, and a helper if you can.
Be ready for the troweling not to be perfect and be prepared for what you will do if you don’t like it. You don’t want to leave a patch higher than the surrounding area. It will get jarred loose, especially if you have any forklift traffic. It’s ok to leave it a bit low.
This sets up quickly so you can add more in 5-10 minutes and get it just where you want. If it is looking like a disaster, pull it out and try again. It’s ok. The only place you will have a problem is if you put too much in. It will require professional equipment to grind it down flush.
A flush patch will be the longest-lasting patch. So that will be our goal even if it takes a few tries.
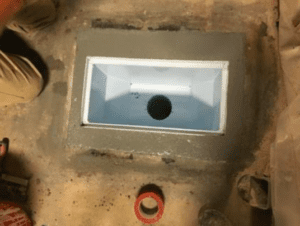
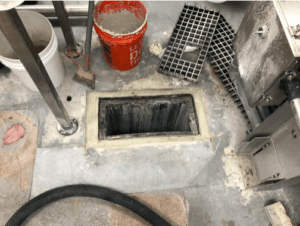
Here we have an area cleaned, prepped, ready to be patched
Placement
Follow the directions for mixing, make a bit more than you think you need, and you want it to be a bit loose as it will get firm quickly. Think about mashed potatoes when you place it in try not to plop it in but scrub it a bit to eliminate any air pockets. Add in enough material to get it to the top and see if you can finish it nicely. If not, leave it a bit low, and make some more in a few minutes and try to get it smoother.
Take your time.
Tip
One of our favorite techniques for getting a just-right height repair is to place it a little bit high, let it set up a bit, then using a sharp edge of trowel we will cut the mortar, the base of the repair should not be moving around, and the shavings will stick together.
If the base of the repair is moving, stop, and wait for it to get a bit harder; otherwise, we won’t get proper adhesion. Our preferred technique is to put the ends of the trowel on good concrete to set the appropriate height and then cut off the high material with a sawing motion. If it’s a bit low, that’s ok; we can come back and add in a smidge once this has hardened.
Joints
Patching a joint and getting it to last is a bit advanced. Many people try this, but few patches last, because a joint is unsupported on one side, and many people fill in the joint. When the joint moves, it weakens the patch or debonds it completely. Add a little forklift traffic, and you soon have powder. Stay tuned; we have a couple of tricks below to allow you to accomplish this
If you are patching the edge of a joint, know this will likely be very challenging to repair, especially if the repair is small. Resist the temptation to fill in the joint. This only works if there is no movement in the joint, including areas with temperature fluctuations or forklift traffic, and that rely on movement.
When this movement happens, the patch will mainly be trying to glue these two huge slabs of concrete together. No matter how good of a job you do, a patch can’t hold these two slabs in place. So, you can fill the patch and just the joint next to it. Then, in a minute or two, when the patch is starting to harden, you can use your trowel to cut the joint and remove the joint’s material. If it’s a little bit ugly, that ok; leave it low, and you can always add more in a bit.
Here the area has been patched in flush with the surrounding surface, ready for long term use.
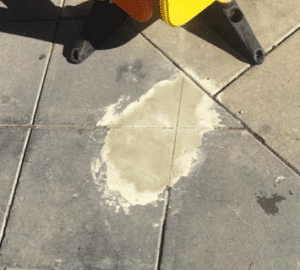
Notice how the joints have been recut, allowing the patches to be independent, essentially four separate patches, not one patch holding four pieces of concrete together.